Now that I have a finished animation, I would have to say that in my opinion, the project was a huge success. After spending the entire first semester struggling to create 3 models, I was not looking forward to having to spend around about the same amount of time not only having to create even more models, but also having to use them in at least a 1 minute animation! However, now that the project is over I think I can safely say that I am much more experienced with 3D Studio Max, and now very much enjoy using it.
I am very happy with my animation. I am particulary proud of 3 scenes. The first one being the Zelda scene. It turned out much better than I expected. I am very pleased with the text box that I added at the bottom of the screen too. The second one being the scene where the lumberjack cuts down the tree. I was expecting to have to scrap the idea of a shadow apearing over the tree's body as I wasn unsure if 3DS Max would allow it. But aparently, it can be done! The third scene that I am proud of is the final scene. I am very fond of the camera work, as well as the tree's reaction to realising that he has been cut down.
I believe that I have used a wide range of modeling and animating techniques. I was lucky enough to have very simple faces on my models, so I did not have to worry about fully animation the expressions of the tree's. The lumberjack's beard also rather conviniently covered up his mouth. So all I had to do to show his expressions was manipulate his eyebrows and mustache.
I believe that I have used cameras and lighting to a good enough standard. Cameras more so than lighting. I was expecting the camera work to be rather difficult, but i was pleasently surprised to find that it was actually very easy to do. In future, I will use the camera tool more often. Lighting on the other hand, while I am pleased with the job I have accomplished, I believe that I could have done a better job in some cases. The main case being finding a certain light and angle which would blend the ground and background together to make it more believable. I was not able to do this for most of my scenes, so unfortunately the background does look as though it has been plastered on. But in some scenes, like the tree giving the lumberjack the branch scene, the blend has been done very well. So I guess that proves that I can do it!
The most difficult process of the whole project was definately the skinning. Never have I wanted to destroy my laptop so badly out of rage. Getting the verticies to all match up was a very difficult job. In the end, I was unable to do so, but got it as close to perfect as I possibly could. It took me a while to also get the hand of the Link tool. This allows 2 or more objects to link together. However for some reason, which I am still unaware of why, sometimes when the tool was used, it just would not work! I believe that this is also the cause of my lumberjack's left eyebrow magically appearing infront of his face whenever a saved sile is open. But I somehow managed to get it all working in the end!
If I had the extra time, I would definately improve it. First of all I would put more detail into my models. While I am happy with them, there is definately some room for improvement. For example, the lumberjack doesnt seem to have a palm, but rather has his hand merge with his arm. I would also like to add eyelids to the model in order to make him blink. Its quite creepy having him have his eyes constantly open! I would also put more time and effort into the scenery. Maybe add small details, such as bushes, flowers, animals etc. Just to give it a little more realism. Finally, I would put more effort into the editing. Although I am very pleased with my final animation, I definately felt as though I rushed the editing as I was quite close to the dealine of the project. If I had more time I would go through all of the possible rendering options and find the best possibly result. I would also try to find a better way of presenting the text in the speechbubbles. I just feel as though they dont really belong in the animation. Perhaps using real voices would have been a better idea...
Overall, I have really enjoyed this project. I have learnt how to use a wide variety of techniques that will definately be of some use in the future. I plan on continuing to use 3DS Max, even if I eventually stop using it as part of my course. I just find it a relaxing way to kill some time...apart from when something goes wrong and I end up going crazy with rage...But still, the amount of things that this program can be used to create is pretty much infinate. I am very glad I have had the chance to use the program and am very thankful for the 2 great lecturers that I have had giving me hints and tips! This project has, in my opinion, been a great achievment.
Friday, 30 April 2010
Editing
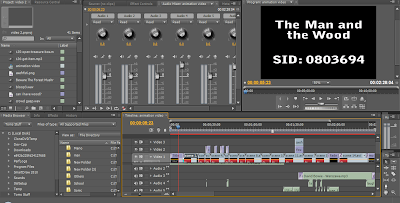
Here is a screenshot of the final video edit in Premiere Pro. Unfortunately, at the time that this screenshot was taken, I had moved all of my render files into another folder. As a result, the program was unable to find locate then all and would only play the text and music. Thankfully, my final video has been made to a decent standard and does not need any more editing done to it (in my opinion). I will still include the file on the hand in CD, just as proof that I used the program myself!
This was only my second time using Premiere Pro. And the first time I used it, I didnt even do much. So really, this was my first real go at using it. I have to say, I really enjoyed using it. I was surprised at how easy it was to edit an entire video together. I had horrible envisions of not being able to include text in my video, or having difficulties with the sound etc. But no, the only problem I had was to do with compiling it. I will get to that later.
It was never my intention to include speech in my animation. I knew from the start that I would prefer just using mumbles. This was mainly because I thought that having the characters mumble rather than actually speak would match the childish style of the animation....but partially because I didnt want to do any voice acting!
The video editing went very smoothly. The Zelda scene was the hardest, but even that didnt take too much time to complete. All I had to do was save an image of the axe in a seperate file, and inport that into the program and use it just as I created the text.
When comiling the render's in 3DS Max, you have a choice of several different options. We had been told to use MJPEG as the compressor. But loading an MJPEG render into Premiere Pro would result in the avi file not playing! Instead, the video had to be rendered in Microsoft Video 1. This wasnt too bad, just a slight inconvinience.
I am very pleased with the final outcome. The only thing that I am annoyed about is the quality of certain scenes. The scenes with text and some of the scenes with the lumberjack seemed to loose some of their colour. I assume it has something to do with the way it was rendered. Luckily though, its not too noticable. Other than that, I would say the animation was a success!
Scene 14
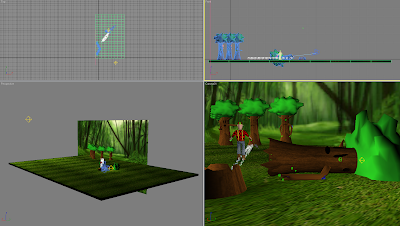
This is the final scene. It starts with a close up of the stand alone tree's face. He looks around, then slowly realises that he is on the floor. The camera then pulls out and reveals the tree cut in half with the lumberjack walking towards the 5 trees who have been watching the whole time.
This scene caused me some trouble. For every scene where both the tree and the lumberjack model have been in the same scene, I have had to merge the 2 model files together. This caused a problem when I realised that the tree model was about 4 times larger than the lumberjack. Luckily, I was told of a way to fix this. By selecting the model that I wanted to resize, then going into the Utilities menu, selecting More and then Rescale World Units, I was able to resize them. This wasnt as easy as I made it sound though. For some reason, when the models rescaled, the biped would seperate and the anchor would move far off from the biped itself. I had to constantly move the biped bit by bit until I found where about the anchor overlapped the model. I was able to get away with it in previous scenes, but this scene was different...
It just would not work for some reason. I think it was because there were more than 1 tree in this scene. So instead, I had to delete the skin, resize the model and the reapply the skin. This actually turned out to be much easier than using the other method. It just took a lot longer! I also had to delete the skin for the stand alone tree so that I could edit the model.
I did want the lumberjack standing above the tree while having him shake his fist at him, but I couldnt get the fist shaking to look right. I believe it worked out for the best though, as having the lumberjack walk away towards his next victims is much more effective.
I am very proud of the camera movement in this scene. I believe that it makes the scene. All I did was use a camera and set several key frames of it in a different position. Getting it to rotate and then move backwards took as while, as the camera would start to move right from the start instead of at the desired frames. I soon realised that it was because I had not set a key frame for the camera's movement.
So as you can imagine, this scene was by far the longest to complete. But I am very proud of it!
Scene 13
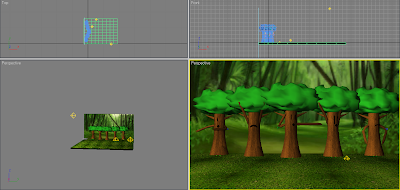
This is another reaction scene. The trees all react differently to the lumberjack cutting down the tree that helped him. The first one looks for a way to get away but realises it useless, the second screams then holds his head, the middle points in disbelelief, the fourth (who was the one who covered his eyes in the previous reaction scene) removes his hands and the faints at the sight. Finally, the last tree just looks sad, knowing what is about to happen to him.
I wanted to get them all to react differently, as real people would do if they just witnessed a murder. It was all simple to do, just the usual morpher and Auto Key tools.
I added 3 Omni lights in the scene. The usual one in the sky, and 2 more to highlight each of the trees faces. I chose to use 2 to highlight their faces this time because only using one would result in 2 of the trees still havened a darkened face. So the scene may be overly bright, even with the 2 toned down Omni lights, but at least the trees faces are easily visable.
Scene 12
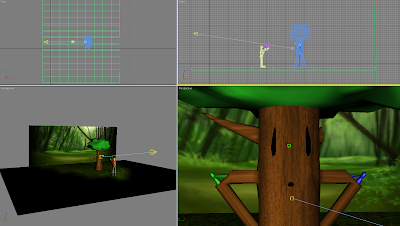
This scene is where the animation starts to become more sinister. The tree is pleased that he has managed to help the lumberjack and smiles. A shadow of the axe slowly rises on the body of the tree. The tree opens his eyes, then screams.
I am very happy with this scene, as I believe that it is very effective. In order to get the shadow effect, I had to position a taret light at such an angle where it would only cast part of the lumberjacks shadow on the tree. It took quite some time to get the angle right, but I eventually managed to get it right!
Of course, the target light also made the tree cast its own shadow. As the background is literally right behind the tree, it would cast a huge shadow covering almost the entire background, ruining the illusion of distance. So I had to remove the whole tree model's ability to cast a shadow. An easy fix!
The lumberjack's arms are at funny angles due to the position of the axe. However, I was able to leave it as the lumberjack never fully reveals himself, and only part of his shadow is shown. So it is thankfully not so obvious.
Scene 11
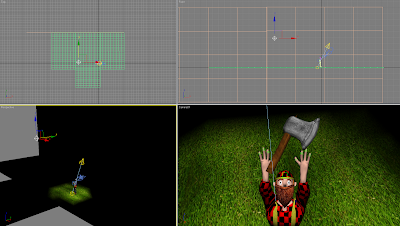
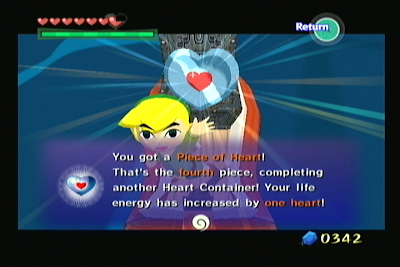
In this scene, the camera dramatically pans around the lumberjack as he finished his creation. Upon completing it he lifts it into the air and displays it to all. This scene was inspired by The Legend of Zelda games, where the protagonist would lift his item into the air whenever he opened a treasure chest. I just felt that it would be an amusing parody to put in my animation, especially as it is aimed for children, and the Zelda series is one of the most popular video game series with children (and adults alike).
I made the camera start by the side of the lumberjacks face, then slowly pan around to his back. Once he lifts his head (and finishes his creation), the camera swiflty moves above the lumberjack at such an angle to show his entire body, as well as the newly created axe.
I used a single Omni light in this scene for while the lumberjack is creating the axe. When he is done and the camera pans upwards, the target light takes over from the Omni light. The entire surrounding area becomes darkened, with the target light creating a spot light effect. This makes the scene much more dramatic.
In order to get the axe to appear as it does, I had to make it invisible for most of the scene. As the lumberjack turns around, the opacity is increased to full. To get it to spin on the spot, I just used the select and rotate tool and set 3 key frames of it spinning.
Scene 10
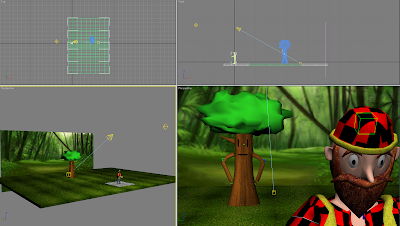
In this scene, the lumberjack is doing something to the branch. The audience and tree and both left wondering what it is he is making until the proceeding scene.
In this scene, it becomes extremely obvious that I forgot to included eyelids on my lumberjack model. I did try to edit the verticies but that didnt work. I also tried to add them seperately, but they would not stick to the face. So in the end, I decided that my lumberjack was born without eyelids.
As well as the usual Omni light, I added a target light in order to highlight the tree's face a little more. It was also intended to blend the ground and background together some more, but I dont believe that this was succesful.
Scene 9

In this scene, the tree gives the branch to the lumberjack. He thanks the tree then walks away. Again, I didnt feel the need to include a specific camera shot, so I used the angle from the perspective view as I felt it fitted the scene well.
Now in this scene, I reused the ear-less tree model in order to save some time. Unfortunately, this meant that the ear was still attached to his hand. This was fine for the first half of the scene, but it caused me some trouble when he passes the branch to the lumberjack. I couldnt figure out how to de-attach it from its hand. So to get around this I had to set several key frames of the branch in the lumberjacks hand. However as it was still technically attached to the tree, whenever the tree's arm moved, so did the branch. So I had to constantly play the animation and every time the branch jumped out of the lumberjack's hand to follow the tree, I had to move it back in his hand and set a key frame. As a result, the animation is a little jumpy. But it was the best that I could do.
On a side note, this is the first scene where the ground and background blend into each other very nicely! This is how I tried to get it for all of the scenes, but had no luck as I couldnt get the lighting in a position to do so.
Also, I found out that I could not use footsteps mode, and then continue to animate the model once it has stopped walking. I had originaly intnded to have the lumberjack walk up to the tree and take the branch, but I had to skip this. In order to get him to leave the scene, I justy set a key frame of him away. This is why when he leaves, the animation makes it seem almost as if he is floating.
Scene 8

In this scene, the tree pulls off his ear, looks at it then stretches out to give it to the lumberjack. I didnt feel the need to use a camera in this scene. However, thinking about it, maybe it would have been more dramatic to have a close up of his face as he pulls off his ear, then pan out to show the results.
Now this scene caused quite a bit of trouble for me. In 3DS Max, if you try to edit a model that has a skin applied to it, the model messes up. So if I wanted to remove the ear from the model, I had to delete the skin, remove the ear, and then reapply the skin to the model. This was very annoying and took me a while to realise. I was very detremined to save myself some time and find a way to get around it, but i couldnt. I had to do this again in a later scene...
I then made the ear attach to the tree's hand. This wasnt as hard as i was expecting. Not attaching the ear to his hand anyway...To do this, I had to create a dummy and attach it to the hand. Then I made the ear attach to the hand too, and then whenever I moved the ear, the arm would follow it! The downside of this is that the arm literally follows the ear wherever it moves. So if I were to move the ear behind the tree, the arm would bend at an awkward angle. So I had to be extra careful when animating the arm.
Scene 7

This scene is simply a reaction scene to the stand alone tree pulling off his own ear. Most of the trees stare at him blankly, while 1 tree cant bare to look and covers his eyes.
Not much animation in this scene. Just blinking and minimal arm movement. There was also no need to use a camera as it is just a reaction shot, so a fixed camera suited the scene well enough.
Nothing else worth mentioning for this scene.
Scene 6

In this scene, the tree attempts to pull off his left ear in order to give it to the lumberjack. Its a very simple scene, as it focuses on the face of the tree. All I had to do was once again use the morpher and Auto Key tools.
As the tree closes his eyes I did want to change the mouth to make it look as though it was a little painful, but I was unable to come up with a mouth to express this, as I only wanted it to be a single line and felt that a sad face would give the wrong impression.
Thankfully the ground is not showing in this scene, so I did not have to worry about the blend between the ground and background. And as usual, the Omni light is in the sky above the trees face.
Scene 5

This scene is very much like scene 3. It's almost exactly the same, the only difference being the pose of the lumberjack. In this scene he simply looks towards the camera (which incidently is coming from the same angle as the stand alone tree) and gives the tree a thumbs up. This was done the same way as before, simply by creating key frames in the Auto Key bar.
Scene 4

In this scene, the trees respond to the lumberjack with suspicion. They all react differently to his request. It is clear that none of them want to give him a branch, but before they know it, another tree says that the lumberjack is welcome to have one of his.
As I mentioned, each one of the trees react differently. In order to do this, I had to use the morpher tool to morph the expressions of each tree. I also used the Auto Key to set key frames of each movement. For example, having the standard pose in te first frame, then having an arm moved to the head in the next key frame. Then when the animation is played, the movement will be automatic. This was nto hard, but tedious. VERY tedious...but worth it in the end.
In this scene, the camera starts off low, as it did in the previous tree scene, then slowly rises to create the impression of them losing their confidence. When the other tree shouts out, the camera shifts to face the stand alone tree. I believe this is an effective shot, as once again it is as if we are seeing it all from the perspective of the lumberjack.
I usd 3 lights in this scene. 2 Omni lights and 1 target light. The first Omni light is in the same position as the previous scenes. In this scene it becomes clear why I placed it there. It is so that there is light on the face of the stand alone tree. I didnt want to the audience to not be able to see his face, so I made sure to keep this paryicular light consistent throuout the animation. The other Omni light is next to the trees in order to lighten their faces. The target light is behind the stand alone tree. The aim of the light was to try and blend the seam between the 2 background planes together. Unfortunately, I dont believe that I was sucessful in doing so. I still decided to keep it though as it does improve the seam very slightly.
Scene 3

This scene was very simple to do. The lumberjack is asking the trees for a small branch. So I made his arms and head rise, as well as his eyebrows and mustache move in such a way to make it seem as though he is smiling. This was all done simply by adding key frames in the Auto Key mode.
It seems as though I forgot to add light to this scene. luckily, the scene isnt really in need of it, as the model can be made out very clearly. The only annoyance is the lack of consistancy between lighting with the previous scenes.
I also felt that there was no need to add a camera as I just wanted a fixed shot of the lumberjack's face. So I just rendered it in the perspective view.

I came across one consistant annoyance with my 3DS files. Every time I open a file with my lumberjack in it, his right eyebrow would not be on his face, but rather floating in front of it. I have no idea why this happens. I am guessing it has something to do with the way that it is linked to the model. The only way to get around this was to create a new instance of the left eyebrow each time I opened the file. Veeeeeeeery annoying.....
Scene 2

In this scene, the audience are introduced to the 5 main trees that act as the head's of the forest. I kept the scene relatively simple. I wanted the camera to slowly zoom in as if we were seeing the trees from the perspective of the lumberjack. I also decided to make the camera tilt downwards slightly in order to make the trees look taller which would create an impression of importance.
I used 2 Omni lights in this scene. 1 above the trees in order to create the impression of the sun beaming through the forest. The other one was placed on the ground to the right of the trees (the tree's left). This was simply so that there was more light on the faces of the trees in order to see their expressions.
There isnt too much animation i this scene. Mainly just the trees blinking. This was done by creating a capsule shape, and modifying it to become extremely thin, almost as if it were a plane. I applied the capsules to one of the trees, then made a copy of it. I made this copy have closed eyes. Then using the modifier tool, I was able to get the eyes to morph from open to closed eyes. This wasnt a hard job, just very tedious. Especially in later scenes when each of the trees have seperate expressions.
Scene 1

The opening scene of my animation.
I wanted to have the opening shot of the lumberjack walking through the forest with the trees all staring at him as he walks by. I used footsteps mode on the lumberjack in order to get him to walk on a set path. Although this meant that I would not have to animate the legs myself, I in turn had to animate the arms. This is because footsteps mode would automatically move the arms into an unnatural position. To fix this I had to set 2 key frames for each arm, 1 with the arm at the lowest point, and another with the arm at the highest point. i then repeated these key frames throughout the animation.
I was lucky enough to find a background that really suited my scene. The only problem i had was trying to get it to blend in with the material I used for the floor. In some scenes it worked well, but that was all because of the lighting. In this scene it just wouldnt really blend no matter what lighting I added. However, it still works well and I am very happy to have found such a good background for my animation.
I chose to use only 1 omni light in this scene. I stuck it behind the camera at an angle that would light the faces of all of the models. I also had another reason for sticking this light here, but I will come to that in another blog post.
I used a target camera in this scene. I couldnt have the lumberjack just appearing in the forest, or walking through the background. So in order to cover this, I decided to use a swoop down effect. This way I could start the camera with one of the trees blocking the lumberjack from view, and then as it swoops down he slowly appears. I believe that this camera effect works very well for an opening shot.
Wednesday, 7 April 2010
Model Problems
Over the past few days I have had several problems with my models.
The first one being that I could not figure out how to attach a biped to the skin of my tree model, despite having already done this to my lumberjack model. This problem was solved by:
1. Deleting the skin and then deleting the turbosmooth.
2. Select the mesh, then click the UnLink Selection button.
3. Add a new skin, add the bones.
4. Add a new turbo smooth.
I think it was because I applied the turbosmooth first so it wouldnt allow the 2 to merge.
My next problem was with animating the tree's facial expressions. I followed the lecture tutorial but for some reason the eyes and mouth would not still not move when applying the morpher modifier. However, with some help from Richard, I found out that the morpher tool only works if the object itself is modified. If the position is moved, it will not apply when the animation is run. All I had to do to fix this was to move the eyes/mouth and set them to key frames. Simple as that!
Now that these problems are out of the way, I can concenrate on the animation. Hopefully I wont come across too many more errors!
Subscribe to:
Comments (Atom)